Anicept Vex
firstly,
This 3D printer has been made possible by Hack Club, Alex Ren, and the awesome Polymaker Joel. Let’s give them a hand! 👏👏👏
Made by: @anicetus
Repository link: https://github.com/invictus-anic3tus/anicept-vex
Total hours so far: 171
- ✅ I have a 3D printer
about the anicept vex
I’m Anicetus, and I’m making a CoreXY because my Anycubic Kobra 2 Neo doesn’t print over 250mm/s and can’t print hotter than PETG. This will change all of that.
🕐 Speed: 350mm/s
📐 Build size: 230mm x 230mm x 260mm
👍 Materials I want to print with: anything up to 300°C! Mainly pla, petg, and tpu
You may be wondering where I got the name “Anicept Vex.” It seems rather strange.
First of all, the first word is a play on my name, Anicetus (which means unconquerable in Latin). It’s basically just compressed to three syllables. “Cept” comes from concept, invoking thought and power. It’s also super cool sounding.
The second word, “vex,” is English (and Latin!!) for making somebody annoyed or frustrated, as you probably know.
It gives off a vibe of hot, fast anger, speedy and deliberate. Another Latin translation for it is to rouse or to excite, again invoking heat and agility. It is also a shortening of “vexare,” the Latin word meaning agitation or shaking.
Again, a short, fiery, awesome name.
OK, good. Down to business.
researching and printhead CAD
day 1 - feb 2 ‘25
Today I’m researching some parts!! Good stuff. I think ima use the Phaetus Rapido ACE hotend and BTT SKR E3 mainboard. Other than that, I have no idea.
The Rapido ACE HF is built for ~45mm3/s printing, which is really really fast and happy. I may upgrade to the UHF if I’m underbudget and want to go 75mm3/s.
I’m going with Nema 17 stepper motors, the most popular for CoreXY.
So far, we’re at 125 USD. 😬
Next, I looked for extruders. I went with the Orbiter v1.5, since it’s smaller and has a lot of support. For PSU, I went a generic 24v 600W.
I started CAD-ing, and got only the hotend and extruder in their places :P
Research and parts: 3 hrs
CAD: 30 minutes
day 2 - feb 3
I started today off by doing some research! Some Slack members told me that the Orbiter v1.5 wasn’t going to cope with the high-flow Rapido Ace, so I decided to look for a new power pair.
I asked ChatGPT about some stuff, and it pointed me eventually to the Orbiter v2.0 and the Phaetus Dragonfly BMS, getting closer to 450mm/s which is pretty nice! The Dragonfly can also get to around 300°C, which is perfect for PETG and some hotter filaments.
Next, I remembered something kind of big: Klipper host. In my opinion, Klipper is way better than Marlin at a lot of things, and it was a must in my design. I overlooked the hosting, however. I thought, “Well I can use the Raspberry Pi 3B from my other printer, right?” While that could be a viable option, ChatGPT (coming in clutch yet again) showed me instead the BigTreeTech Manta M4P + CB1, which is a mainboard that has a Klipper host integrated with the mainboard! If I’m under budget by the end of this thing (unlikely,) I’ll upgrade the the M8P, which has more capabilities for extra motors and stuff. I looked for some linear rods and got a good idea of pricing, although I haven’t CAD-ed anything since deciding to use the Orbiter v2.0 and Dragonfly. I added a BLTouch to my cart, bringing the total so far to… $240 😭
Yes, that’s nearly the budget right there, without any extrusions or cables or anything. I think I can fit the extrusions and such in the $60, but it may be tight. We’ll have to see!
(Later) OK I did some MORE research and decided to go back to the BigTreeTech SKR E3 Mainboard and host both off my one Rpi. If it goes bad, I’ll buy a Rpi Zero W.
I figured out some stuff with part cooling and whatnot, readjusted the CAD, got the printhead semi-set up, and more! Well that’s it for today.
Research and parts: 4.5 hrs
CAD: 1.5 hrs
day 3 - feb 4
Today was mainly a research day (again.) This is me the following morning because I forgot to update 😁
Anyways, I did a lot of research on the best motors for my setup and found a really good deal for 3 for about $25, and they’re strong enough to let me go around 430mm/s straight. If you want the link DM me or check the BOM spreadsheet above
Then I started CAD-ing, and I’ve got nearly the entire printhead set up! I think I’m going to use a CFD to simulate the fan airflow just to make sure it works, but other than that I need to add the BLTouch, some PETG framing, and I’ll be essentially done there. Also, cable management 😬

Research + parts: 4 hrs
CAD: 2 hrs
day 4 - feb 5
Today I worked on the BOM a bit and researched where I might find cheaper parts. I think I over-calculated how expensive the frame will be (hopefully) so maybe I’ll get out of debt? Worst case I spend 30 bucks out of my pocket.
I have plenty of doubloons from High Seas, but DigiKey and the rest don’t seem to have great parts. Surprisingly, DigiKey has absolutely no 3D printer mainboards, and the stepper motors they have aint worth squat. The rest of the time was basically just CAD, with a side-tangent to try an airflow simulator. I decided not to, though, because I was lazy. I worked on the fans, connected it to the linear rail, and made my logos!
Research and parts: 2 hrs
CAD: 3 hrs
![]()
day 5 - feb 6
Today I didn’t do a whole lot because of schoolwork and other projects. I CAD-ed a little and that’s basically it.
CAD: 1.5 hrs
day 6 - feb 7
Today I had a stroke of genius ok maybe just a stroke and I decided to make the Vex a dedicated upside-down CoreXY! It’s mainly for print farms and stuff because when the bed cools, the printhead just gives it a little nudge and the print falls right off! Also it just looks cool.
I’ll probably make it reversable so you can print like a normal person if you want, with feet that can be put on either side and a removable Klipper host/screen. This does mean using linear rods instead of rails, though, so it may get more expensive? Idk.
Anyways, I’m still deciding on whether to have the motors upside down as well as the printhead, because if they’re right side up (from your view), they’re sitting on the desk/ground, but the carriage is reversed. This means that the model is effectively flipped X and Y (rotated 180 degrees) which may be an issue? I don’t know. Probably not, right? RIGHT??
Either way linear rods are a good thing to do so that’s what I’m doing.
(LATER) I did a lot of research and apparently upside down corexys are a really bad idea. Welp. It’s OK, I’ll do normal CoreXY and use linear rails still because they’re also apparently good for speed and such. I did a tiny bit of CAD
Research: 2 hrs
CAD: 30 min
day 7 - feb 9
Yesterday I had an all-day D Now (Disciple Now) with my church which was very very fun!! No work though. Today was mostly research and some CAD, as I’m working on #printboard a lot now. Trying to get it done 😭
Research: 30 min
CAD: 30 min
day 8 - feb 10
Printboard!!!!!!!!!!!!!!! Some CAD for this though…
My current printhead setup:
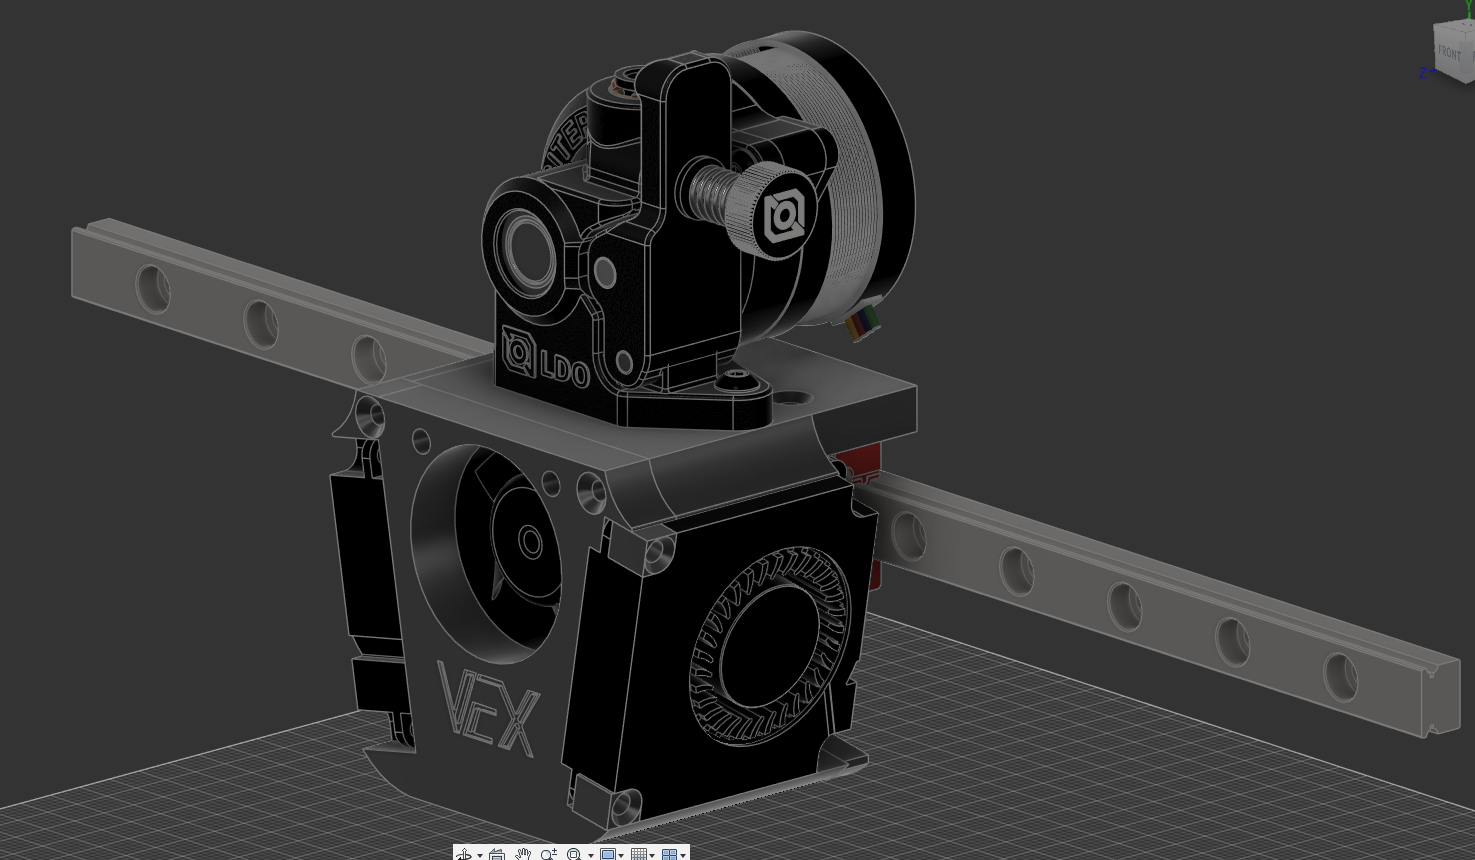
CAD: 1 hr
day 9 - feb 12
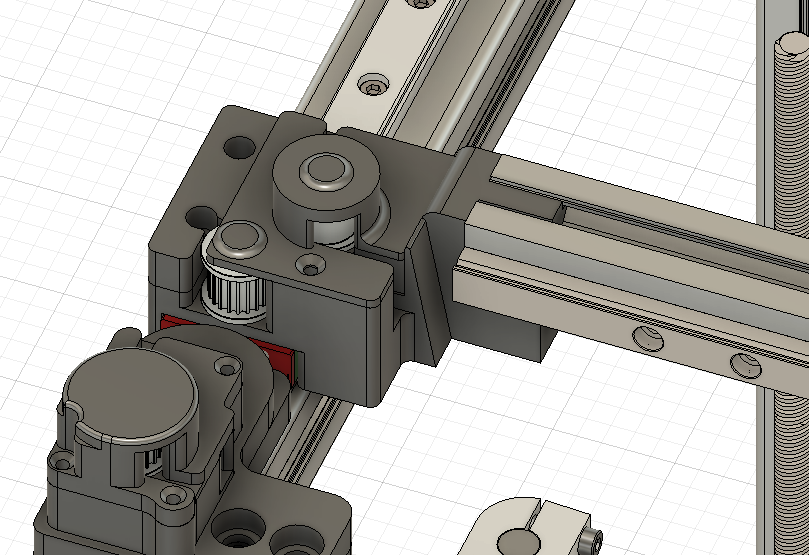
Again, I haven’t been doing a whole lot of this due to printboard, but I was able to get the linear rail mounting and a little bit of the hotend screw mounting figured out. Some pics:
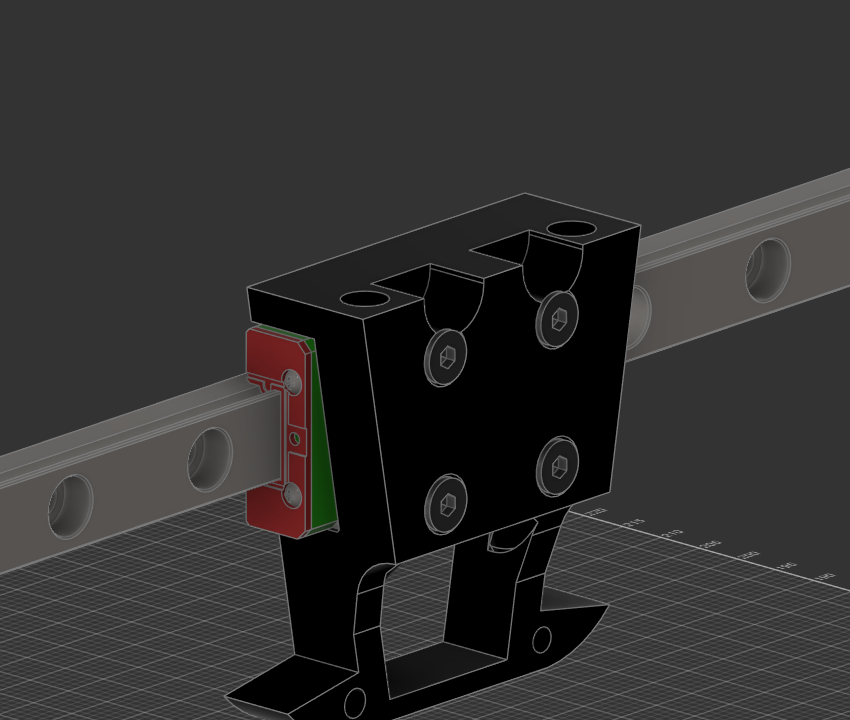
CAD: 2.5 hrs
day 10 - feb 13
Today I researched a whole bunch of parts, from Gates belts to idlers, linear rods, and more! You can see my BOM here!
I also did a little CAD today, importing some models for the bed, aluminum extrusions, and such. I fixed some model symmetry issues and increased the tolerance between the parts and the hotend. I’ve yet to run any CFD (computational flow dynamics) tests, but I may just get all the parts and see how the airflow works in real life instead.
Research: 2.5 hrs
CAD: 1 hr
day 11 - feb 14
Happy Valentines Day! Homeschooling doesn’t usually provide Valentines though. On the bright side, I got lots of candy!!
Anyways, today was a big CAD day. I did research some mechanics, like the z-screws, bearings, idlers, and whatnot, but mostly just fixed CAD part tolerances and adjusted some of the models to make them more symmetric and nice looking. I’ve yet to add the BLTouch and Gates belt connecters though… maybe on day 12!!
Research: 2 hrs CAD: 2 hrs
day 12 - feb 15
Today I only researched stuff, as my hotend turns out isn’t high-flow like ChatGPT said it was, and I needed to find a new one asap. Also researched frame parts and some kinematics!
Research: 3 hrs
day 13 - feb 17
After finallllly getting my printboard submission in yesterday, today I can work fully on CAD and research. All I have left to do on the printhead is the BLTouch, belts, and accelerometer! I finished adjusting for the new hotend, the TZ E3 2.0, which doesn’t get the 45mm3/s that I hoped for in the beginning, but gets 33mm3/s (according to the seller.)
I’m expecting probably 30mm3/s out of it, which is plenty for what I want.
CAD: 2.5 hrs
day 14 - feb 18
Ouch. Turns out the hotend doesn’t fit all the way yet… well I guess I know what I have to do 😭
Other than that, I started the BLTouch mount and did some research on how to mount the belts and accelerometer :/
Research: 1 hr CAD: 2 hrs
day 14 - feb 19
I finally got the hotend to fit! I also mounted the BLTouch and the accelerometer. I started a bit on the belts, but wasn’t able to get them done quite yet. Here’s a video of what my printhead looks like so far!
I also did more to improve tolerances and printablility. I decided to wire the accelerometer through a little printhead tunnel, which is 1) cute and 2) saves space :3
CAD: 2.5 hrs
days 15 + 16 - feb 20 + 21
WOOOOOOOOOOOOOOOOOOOO
I got the printhead done :D
I do still have to do the belts, but I’m saving that for when I get my gantry figured out. I also did a bunch of the frame! Pic (20th):

This thing is really coming together!!!
All I have left to do with the z-axis is add the linear rods and attach them to the bed. The gantry is looking quite daunting, but I guess I’ll cross that bridge when I get to it. So far, the build size is 230x230x280mm, which is way bigger than my current printer (220x220x250mm)! Good deal.
CAD: 7 hrs
z-axis - revision one && electronics housing - revision one
days 17 - 20 - feb 22 - 24
These days I got finally got the Z-axis done! Connected the linear rods to the bed, the lead screw to the bed, all sorts of good stuffs.
CAD: 10 hrs
day 21 - 23 - feb 25 - 27
Got most of the electronics done!! Mounted PSU and mainboard, added a fuse and a power cable thingy!
CAD: 7.5 hrs
days 24 - 29 - feb 28 - march 6
I know my updates are getting less frequent, but there’s really not a lot to update on. I did get all the electronics finished, as well as adding an integrated two-port power strip for the rpi and the filament dryer. I also got an idea of how the gantry will work and fixed some Z-axis stuffs.
CAD: 15 hrs
days 24 - 34 - feb 28 - mar 16
wow… I’m being very bad about updating. I’m so sorry! Tomorrow I’ll post a butt ton of pictures that will mark my progress. my screenshots folder is getting kinda big…
but over these days, I’ve all but finished the printer. I finalized the z-axis and attached the x-aluminum extrusion to the y-gantry. I’ve mounted the gantry on top of the aluminum extrusions to save space and mounted most of the idlers.
So far, here’s what I have left:
- Finish mounting the idlers that attach to the y-linear rods
- Mount the motors
- Create belt models
- Mount the belts to the printhead
- Redo some text on the underside of the plate holder
- Research M5 screws and assorted inserts
- See what lengths of screws to get
- Buy parts! And then design will be done! Not so hard… right?
oh yeah, and funny thing this printer was originally called the anixus vex! I like the current name better, and decided the new one on March 16th. If you go thru this repo’s commits you can see the previous name ;)
CAD: 15 hrs, research 5 hrs
problems: days 34 thru 57 - mar 17 - apr 15
I thought I was bad at updating before… I’ve had a butt ton of school work and other stuff and lowk been forgetting to journal.
anyways here’s what I got done in this month. I finished everything of the list above, and ordered parts. I paid about 70 bucks out of pocket, not including high seas credits. Now here’s where the trouble begins. I posted my design on the 3d printing discord server, open to critique. Turns out there was a ton of stuff that wasn’t going to work, forcing me to all but redesign the entire kinematics for x, y, and especially z. I’ve gone from a single lead screw to dual screws operated on a belt system, like the vzbot. At the time of writing, I’ve just finished the design. It was tough, I’ll admit. But it’s way worth knowing that all the things I’d worried about were OK and that the printer will be AWESOME. All of the parts I’d ordered arrived minus two that got lost 😭
I’m planning to refund the lost orders tmrw, and I also had to refund some 8awg wire that I got in favor of 10awg. The new wire was stopped and delayed by customs, so I don’t have very high expectations for that, either. Oof. I also reached out to polymaker about a filament donation, since the only PLA I have is black, white, and blue. I requested a spool of black PETG and a spool of their panchroma gold-silver pla. I think it’d look fantastic with the gold pei sheet and silver aluminum extrusions! It’s been a few days, though, and they haven’t responded. I don’t have high hopes for that either, and worst case the printer is kinda splotchy looking.
It’s been a real journey, and I’ve learned a lot thus far. Like, don’t buy parts before you get people to look at your design. Bad idea. Speaking of parts, I have to return a few things:
- Z flexible coupler: not necessary with a z belt system
- Lead screw: 20mm too short with the new design
- M5 screws: should have been M6 (for connecting stuff to the corner brackets)
- Part cooling fans: they may not be powerful enough. Getting 5015s would be what I’d get instead, but would mean redesigning the entire printhead. I’ll do some tests with my current 3d printer to figure it out.
- LM8LUU bearings: by using 4 linear rods for z-axis instead of two, I’ll need two more bearings, likely LMF8UU’s, which only come in packs of four. I’d return these and buy the four-pack, but it’s probable that I could 3D print bearings.
Since I already returned the 8awg wire, I only have 4 more monthy free returns from AliExpress. I probably won’t return the LM8LUU’s, and possibly not the M5 screws since they were only a buck fifty anyways. Lead screw is a must, and Z-coupler was five bucks so it’d be best if I can. Again, part cooling fans I’ll have to wait and see.
List of stuff I had to change:
- Shear the motors: I had to add bearings to the ends of the motors shafts so that the tension of the belts doesn’t ruin the motors - $2
- Add dowel pins to the idlers: Pins are necessary because 3D printed shafts to hold the idlers will snap under tension - $4
- Redesign kinematics: The belts have to be routed straight. They weren’t, and I had to redesign everything_.
- Redesign Z-axis: since the entire bed was held up by only one lead screw in the back, it would have sagged immensely. I was mistaken in assuming that the bearings in the front would give it some leverage and keep it up. They would only catch onto the screw and bend the bed more. A kind discord user pointed out the VZBot, which uses two lead screws on either side and four linear rods at the corners of the build plate. I basically copied this layout. No need to reinvent the wheel, right? Anyways I just now finished the lead screw holders and belt system, and it’s ⬇️🔑🔥 (low key fire for you silly people)
Here are some pictures

belt drive pic

belt drive again
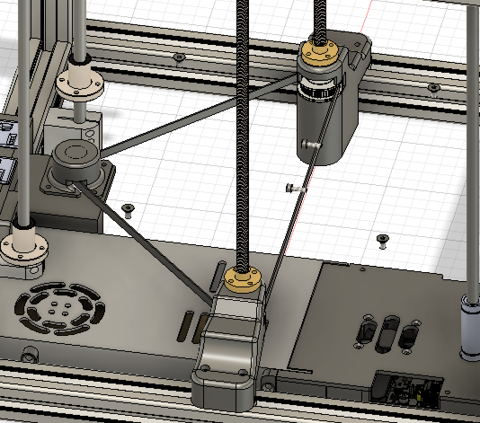
linear rail holder

lead screw holder

castle idler hast becometh mansion idler

x/y idler holders!
For a month of work, I’d give this a solid 40 hours. Not a ton, but like I said there’s been a bunch of school and stuff that tbh takes priority.
parts
day 58 - apr 16
Today I got my current 3D printer back up and running after a week or two of inactivity due to wifi issues. It’s all set and ready, and I started by doing a test. I printed a benchy at 50% fan speed to see what would happen, in order to test if the 4010 blower fans would be enough for the Vex. It turned out well. Not great, but not awful. I did some research and asked perplexity.ai and got the general consensus that 7+ CFM would be best for 30mm3/s or more. The fans I got are about 3.62 CFM each, and I have two, so that could be enough? I’m not sure but I want to try them. I also connected the lead screw nuts to the bed holder, meaning all I have left is attaching the back linear rods. I’m planning to order parts tmrw after some research today.
Here goes nothing.
Research: 1 hr 30 min, CAD: 1 hr
days 59 thru 61 - apr 17 - 19
These days I ordered all of the remaining parts after getting refunds from AliExpress. They should arrive in about a week, and in the meantime, I’m printing parts. I plan to make a livestream of me building the printer on the HC slack as soon as I get parts printed, but I’m not sure how my parents will react. 🤞
But here’s a really big thing.
On day 61,
Polymaker sponsored my 3D printer
That’s right!! I sent them an email, and none other than Polymaker Joel responded by giving me free filament to make the Anicept Vex! Gigantic shoutout to them. Polymaker ROCKS. Like this has singlehandedly rekindled my love of humanity. it’s just a little reminder that good people exist, and i’m so blessed to be able to interact with them. as im writing this im literally grinning widely because of how great it all is. thank you so, so much.
Polymaker🔛🔝
(plz note, if you’re a hackclubber reading this I’d appreciate if u didn’t tell everybody on slack,,, not because they don’t deserve the sponsorship but because if 50 ppl ask polymaker for free filament for the same reason, they may start to become suspicious and less lenient. this can put a bad name on hack club. thx.)
parts arrive - and more problems
days 62 thru 70 - apr 20 - 28
In these days pretty much all the parts arrived, plus my polymaker order! I got a spool of white and a spool of black pla, which I already owned but needed more of, a spool of red pla, a spool of black PETG, and a spool of metallic gold pla!!! My printer is gonna be sick with the white/black/gold theme.
I started 3d printing a bunch of parts for it, and began to piece it together bit by bit to make sure it works. I’m planning to do a livestream of me building it, and I might record it somewhere and link it, but idk if my parents will let me :b
As I’m writing this I’m setting up my new gold pla with a temp tower (looks like it just finished 215°C!) and then I’ll get my black petg set up. I won’t be using the polymaker petg for this project, since, while it’s better, I have some rapid petg for the bigger parts so that it doesn’t take ages to print them.
One kinda weird thing that happened tho, a linear rod from aliexpress arrived empty 😭 Like, you can’t do that!!!! Looks like the seller shipped it empty!!!!!! I applied for a refund but they haven’t given it yet since I can’t really prove it. So I’m waiting on that (actually it’s kinda not necessary maybe. I’ll see.) and a digikey order just for some sttuff like wires, wire nuts, etc.
Anyways that’s basically it. Z axis belt system works good. Oh yeah, I also need to get a build plate from amazon. Will do.
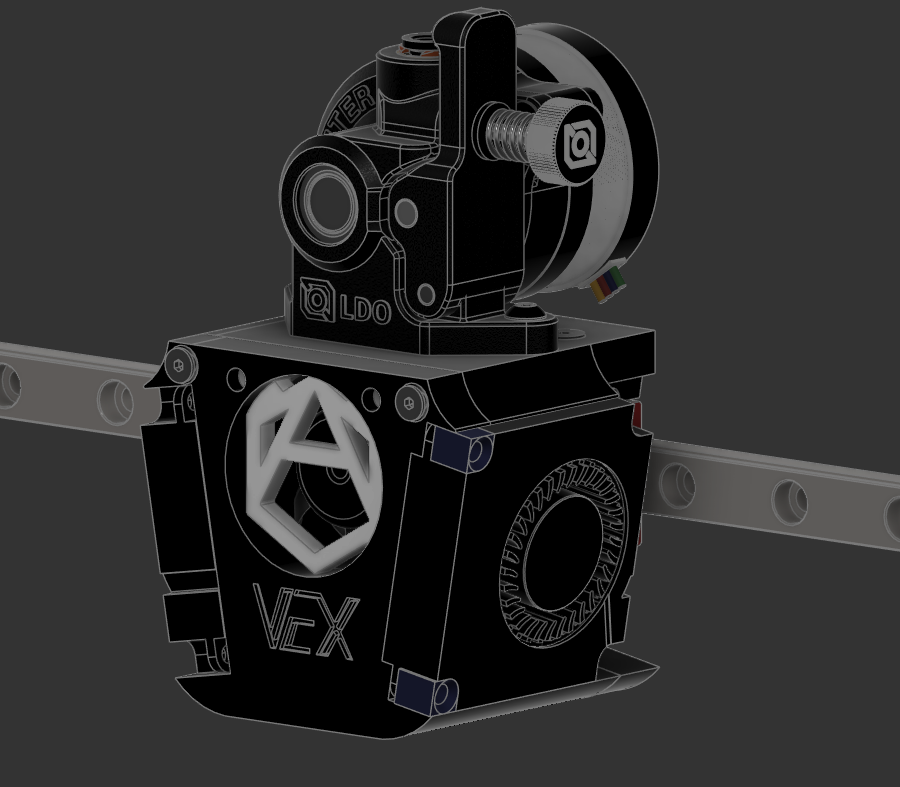
OH YEAH and I also… waiiit… i forgot… oh yeah. I changed the printhead logo to be super sick and much better since it was super ugly. Now it matches my logo at https://anicetus.dev (shameless plug) as a cool hexagon thing:
![]()
and here’s a belt drive rendered pic for good measure

days 71 thru 76 - apr 29 - may 6
Well, my digikey order and amazon order arrived. AliExpress still wont let me refund the package, but this time around I chatted with the seller and they acknowledged that the packaeg was empty. I took a screen recording of the chat as well as the chat ID so they can check it. I really hope I get it refunded! However I’m like 79% sure I won’t need the rod, so no rush on the refund really. 3 rods should be enough according to some geeks in the 3d printing discord.
This is the build plate I got from amazon (gold pei + gold peo). it looks ssooooooo goooood!!! the peo side is super shiny and makes amazing rainbow reflections
turns out I didnt need to get wire nuts from digikey tho, since my dad has some… well it’s too late. completely unrelated but with my new digikey order I now have 14 esp32s and an arduino uno :D
however
I need to do more redesign. Again. Yes. Ow. so turns out my mainboard wouldn’t fit in the enclosure i made for it with all the wires and stuff blocking everything (the spade connectors for the psu are suuuuper long) so i had to totally redesign it. i think im just about done, and I made a new design with the mainboard above the aluminum extrusions and rotated 180° to make it fit better.
unfortunately, moving the mainboard around and such will mean editing the z-axis. this is probably for the better, cuz some geeks on the 3d printing discord were saying that having 4 linear rods will overconstrain the bed or something like that. my current design has 3 rods (which is what I currently have) but if need be I can easily add a 4th (granted stupid aliexpress refunds me)
this means all but redesigning the entire heated bed holder. ouch.
ig that’s enough yap for today. my hour count is super inaccurate already so for the 6 days since last update I’ll give it a 15 hrs of cad.
P.S. I’ve blown through about 500g of filament in the past two weeks P.P.S. I finished my school year so i’ll probably have more time to write these updates!
3d print parts + more issues
days 77 thru 82 - may 7 - 12
so yeah i 3d printed a buncha parts! nearly all of the pla ones. i still have to print the petg bed holder, motor mounts, idler holders, etc.
i also fixed the z-axis and electronics casing thankfully. aliexpress still isn’t refunding me and I decided the 4 bucks wasn’t worth my time so i gave up. no biggie ig. i’ll attach some pics soon, can’t rn
day 83 - may 13
Continued printing parts! I did a lil bit of PETG printing, but ran into an issue. Again.
My fan ducts don’t work at all. Like, 0 air comes out. It’s all bouncing back out of the duct and through the fans’ air inlets. It is 100% not going to work and im afraid ill have to redesign the entire printhead. I’ll experiment tmrw and see what happens.
day 84 - may 14
I THINK I DID IT. I widened the duct holes a LOT to let more air in, and sure enough the airflow septupled. It’s not very focused, but that’s OK I guess. The air still bounces back some, so i may need to do a bit more so that the fans aren’t like blowing directly at a solid wall of plastic. However making the holes any wider would point air in directions I don’t want it to go, so to fix this I’d need to smooth out the 75-ish degree turn in the duct and possibly angle the fans different. But honestly, this new printer will probably be mainly for rapid PETG or other filaments that don’t need a ton of fan power, so I may just leave it be.
For now, I’m gonna keep the ducts as they “air” (hehe) and see how it does with regular ol’ PLA. Wish me luck 🫡
day 85 - may 15
today i didnt do a whole lot due to ANOTHER PROBLEM!!!!!!!!!!!!!! The idlers dont fit in their mounts. the idlers i bought from aliexpress have the standard outer diameter of 18mm, but the models from grabcad have an outer diameter of 15mm! i had to redesign all of the idler mounts, on the gantry as well as on the corners. this was a total pain in the neck and sucked up my entire day. of course I only learned this after actually printing the mounts, so i wasted 3h30m and 70g of filament printing them.
day 86 - may 16
dang… just realized today is when everybody else is going to rmrrf. but im not. makes me pretty sad but also my printer is lagging wayyy behind so ig it’s for the better. today i printed out the motor holders which work realllly well. very proud :D
days 87 thru 94 - may 17 thru 28
i continued printing out all the parts, with quite a bit of minor iterations. as of right now the motor caps that hold the bearings that in turn hold the motor rods that in turn keep it from getting damaged for some reason are inhibiting the shaft revolution and thus are preventing the gantry and printhead from moving. i’m printing out some new ones so maybe they’ll work..? i cant figure out why the old ones weren’t working tho. i guess i’ll find out!
hopefully.
i also started a lot of assembly, and everything seems to be working well. i’m quite happy with the gantry, but the z-axis is being a bit difficult. Really all i have left are the electronics (may need more wire,,,) and the printhead. wish me luck 🫡
day 95 - june 5
oh gosh,,, it’s been ages. i’ve been caught up with a lot of stuff, from vacation, to hanging out with my best friend, to working on a drone for highway, and all sorts of stuff in between. in my off-time, however, I’ve gotten the entire thing assembled, minus the power. this is simply because I needed more 12awg wire, and today i finally got it! I’ll try to finish that later and then… power it on 👀
days 96 thru 98 - june 6 thru 9
assembled the power! I also powered on the printer and it looked good. the power strip finally works too! however when I tried to flash klipper the mainboard just kept flashing for a long time. i fixed it by finding my 8gb sd card (instead of 64gb) and formatting it to FAT32 (ha fat). after a bunch of fiddling around i got klipper screen working too!! I heated up the bed to 60°C and it worked perfectly. I’m not going to heat up the nozzle quite yet since I need to do a little work with it regarding thermal grease and whatnot. i set up sensorless homing and the Klicky, until my Raspberry Pi decided to malfunction. Tomorrow me problem. i was focused on my drone mostly these past three days.
5 hrs
day 99 - june 12
got moving in all 3 axes working… about to leave for summer camp
1 hr
day 100 - june 16
got back from summer camp… what a great day 100. got the hotend to extrude filament!!!!!! I’m so close… not a whole lot of time today but tmrw i’ll get started calibrating all sorts of stuff.
day 101 - june 17
i calibrated my extruder steps today, and had a ton of issues with the sensorless homing again!!! What’s going on? I tried to start a benchy but so many things were going wrong.
day 102 - june 18
these are hard days. hard, hard days. these are the days that stupid design considerations and bad advice hurt. the gantry wobbles way too much, the bed sags a lot, and in general it just really hurts to see all my effort from these past months to turn into such a bad printer. i tried a benchy and it failed miserably. miserably…
day 103 - june 19
i’m not going to let this stop me. I’m not going to give up; my name is Anicetus — “unconquered.” How could I call my self unconquered with a 3D printer unfinished? How could I call my self invincible when I’ve been conquered by a project? How could I give this up? How could I quit on this thing? How could I spend hours and hours designing, building, fixing, and fixing again, just to sweep it under the rug? How could I lose?
I wont
Whatever it takes, I’m going to finish this thing. This will be on my resume, and I will make it the best. I’m going to rock the world someday. It may not be with this, but if I give up on every project I start, how could I? Anicept will rise to the occasion.
The main issues from yesterday were:
- The gantry wobbled a lot, meaning the nozzle was all over the place
- The bed sagged with pressure, ruining the first—and subsequently, every layer.
I fixed the gantry wobbling by hot gluing it in place but the bed I need to figure out. Idk how im going to brace it
day 104 - june 20
ok so the main issue i’m facing is layer shift. originally, i thought it was due to the nozzle hitting the bed and thus making the motors skip. this is what I’ve been trying to combat with securing the gantry and bed.
but i was wrong! i started a benchy, and when i heard the motors skip, i paused the print and took the benchy off. i resumed the print, and watched as the motors were still skipping without anything to bump into! I asked perplexity.ai about it, and it said i should try to change the Dupont connections to JST XH like the mainboard accepts, and if that doesn’t work to bump up the run_current so that they have more torque. I’ll replace the connectors and start a new benchy tmrw.
day 105 - june 21
ok i replaced the connectors for X and Y (Z moves so little idt it’ll matter) and started another benchy. no luck, unfortunately. I increased the motor run_current from 0.58 A to 0.9 A in hopes of providing more torque. I did this in line with the motor current section of ellis’s print guide. But it still wasn’t enough!
I found a well-used formula saying multiply the peak current of your motor by 0.707 and then by 0.85 for a safety margin, which I did and got about 1.2A. I put that in and started another benchy!
day 106 - june 22
1.2A did nothing!!!!!!!!!!!!!!!!!!!!!!!!!!!!! AAAAAAAAAAAAAAAAAAA
I lowered the accels dramatically, hoping it would work. I found success with… 1k accel… I know it’s slow, but I haven’t tested out the max on this thing yet. I looked at my new benchy… and it was really short! Like i didn’t know what happened, but it was all squished down. I started another one after almost doubling the Z-axis motor’s amperage (i’d heard sounds coming from it) and it worked!!
I got a good lookin benchy! Pics tmrw maybe :D
day 107 - june 23
haha the rpi isn’t working anymore!! when i plug usb to the mainboard into it before booting, it freezes right after booting. when i plug usb into it after booting, it glitches out and freezes. but it works perfectly with my other printer’s mainboard.
later: fixed! I added dtoverlay=dwc2 to /boot/firmware/config.txt which i think did the trick. now i can finally get back to working on this thing.
day 108 - june 24
today i worked on sensorless homing… again. I really am starting to hate sensorless homing, and I dont recommend it for anybody making a custom build. it’s so finicky and unreliable, especially for slightly janky kinematics systems. for instance, sometimes the Y axis homes fine, sometimes it jams itself really hard up against the back of the printer, and sometimes it thinks that 0 is in the middle of the print bed. It’s really annoying. I may have to switch to sensor homing, but i dont have any switches :sob:
[later] ok well this is quite strange: running g28 y, g1 y100, and then g28 x manually works fine, but using the macro doesn’t. idek anymore
day 109 - june 25
i put a endstop on x axis for homing. i hate sensorless homing so much. now it works perfectly.
also it turns out my y axis is reversed! i thought the standard homing position was back left, but it’s actually front left. thankfully it was an easy fix by changing the endstop_position for y to be the max in the y direction instead of 0.
day 110 - june 26
i finished re-setting up klicky due to the reversed printer! I also did some speed tests and was able to get my printer to (at least, just keeping this for now) 350mm/s at 12k accel! Much better than 100mm/s at 1k. i’m going to print a benchy at these speeds once i have the chance. i was able to do this by disabling stealthchop, klipper’s built in feature to keep motors super quiet, for the price of little power. i disabled it on Z as well, and I like how powerful it sounds now.
day 111 - june 27
it’s the big triple one! today i fixed the bed mesh, since with a reversed Y axis my bed meshes were reversed as well. i fixed the corner coordinates and ran another mesh, and got a range of 0.7mm. not super great but I’m happy with it, especially for a custom build!
update: i forgot to calibrate it with the bed heated, so i put it at 65°C and did it again. I got 0.5mm range! Yay!!
what i’ve learned from making the Anicept Vex
- NEVER EVER EVER EVER EVER EVER EVER trust AI alone. Always google it first and if you’re lucky, some rando on reddit has already answered it. if not, get some help from ppl who actually know what they’re doing. If you have to use AI, use perplexity it uses much more sources than other ais, like chatgpt. the way most ai works is it scours the web for data, and whether or not it’s true or not doesn’t make a difference. it might take the statement “idk but im pretty sure that it gets up to 45mm3/s” and use it as proof that the hotend gets up to 45mm3/s, even though it’s likely just somebody’s arrogant opinion. I was researching what hotend to get and chatgpt told me that the Phaetus Dragonfly gets up to 45mm3/s, when, in reality, it only gets 15mm3/s. I’d already designed the entire printhead when I learned this, and thus had to redo a lot to account for a new one. Not only does trusting AI waste time making you redesign and do more research, it wastes time and effort making you redesign and do more research.
- dont make compromises. it never works. dont buy the cheap thing because its cheap. there’s a reason it’s cheap. and when designing stuff, dont maximize space. leave tolerances and tons of room for wires and whatnot. cutting corners, as fun and easy as it may look, never works. this is probably cliche to you, but it’s very true. when i was designing the z-axis (the first time) for the vex, it seemed ok to be able to use one screw in the back and two rods in the front. this was a huge mistake on my part. in the back of my head, i thought the bed might sag and it might not work, but i ignored it. welp now I’m redesigning it, for the second time. don’t make compromises.
- do your research. always, always, always read aliexpress (or amazon) reviews. check the product specifications before buying. I thought my motors had a 2.7mH inductance, but they have a 3mH inductance. This isn’t ideal, and will hamper how fast I can print. I thought it had the lower inductance because, surprise surprise, the aliexpress page said it did. but when I got the motors, the card that came with them clearly said 3mH inductance. I checked out the official store, omc-stepperonline.com, and the page there clearly said 3mH inductance. the aliexpress page was dead wrong, and it’s costing me. I won’t return them, because I couldn’t find any better motors for a decent price anyways, but always remember to do your research, and never trust aliexpress specifications. you’ll be sorry if you don’t.
- dont get discouraged. believe it or not, you can do it. It’ll take time and effort, and you’ll be sick of it, but power through and just DO it. the only way to get a hard thing done is to do it or hire somebody else to do it, and nobody can afford that. when you get bored or angry, don’t doomscroll youtube shorts. literally just do it. honestly this is tough for me, especially designing tough parts like the printhead and gantry of the vex. but when it’s done, it’s DONE! Now reward yourself and watch 11 hours of zach freedman.
- remember that you decided to do this project, the highs and the lows, so have fun with it. it’s easy to get frustrated at the amount of work you have to do, but soon enough you’re gonna be a responsible adult who has an actual job doing something likely even more frustrating. have fun with a project that you’re doing of your own free will, and know that soon enough it’ll be over, and you’ll feel both sad and happy. You’ll be sad because it was a big journey that you no longer are on, and happy for the exact same reason.
- you’re not alone. probably. at least for infill, it’s me and a dozen other active members. they’re doing the same thing you are, and probably feeling just as frustrated as you. go chat with them about whatever it is you’re doing. it helps. and help people who are new or just starting. use your minimal experience to guide people who were in the same place as you. when I was starting, i had a bunch of help from assorted people, but i had to research a ton of stuff myself. i.e. what motors, belts, and other parts to use. if other people are working on the same thing and are a bit ahead of you, they’ve likely already researched those parts. ask them what parts they use. to be fair, it may not apply sometimes, particularly with a scope as broad as a 3d printer to design. dont be afraid to ask for help, and especially not to give help when you can
- here’s a bit of 3d printer specific advice: design the printhead, gantry, and z-axis before you design anything else. I went straight from printhead to electronics casing because I was scared of the gantry. dont be. it’ll be super tough, but it’ll save you a bunch of heartache having to redesign stuff because it doesn’t fit in what you already have.
Well that’s it!! Hope that helps somebody.
pictures!! my timeline of the printer :D
Ahh… simple beginnings. Here’s when I was using the Rapido Phaetus ace hf 2 hotend with the orbiter v1.5 extruder:

The earliest full revision of my printhead!

Created two logos (one for the earlier name of Anixus and one for the Vex,) reoriented the linear rail, finalized the front panel, and made the top panel!

COLOR!!!!!!!!!!!!!

Aha the backing

mounted the ADXL and 3DTouch!

wow! started on the frame! looks kinda ugly and fat :b

looking better! got the z-axis motor and gantry in place

placed and mounted the PSU, z-motor, linear rods, and the mainboard!!!

Ah… the power panel PCB. Didn’t turn out to work, but I learnred some about buck converters!

Wh-what’s this?? A power strip built into a 3d printer?? Amazing!

3DTouch didn’t work 😭
Turns out those Chinese clones aren’t worth it… I went Klicky!!!!!!!!!!!!!!!

Mounted the linear rails and connected the x-axis to the y! Also started them idlers :3

“What questionable design considerations?” -Anicetus, 20xx - 2025

✨Mystical Castle Idler!✨

So many different logos! (I went the all-bold one :D)

Wow! Beautiful render

That’s quite a gap to bridge,,,
