Quantum One

Project Information
Made by: Henry(@HenryNerd)
Repository Link: https://github.com/Echo-Labs-Development/Quantum-One
Total Hours: 75 Hours
BOM
Design Considerations
Goals
- Quiet enough to be next to you on your desk
- Easliely Hackable
- Good Looking
- Buildable for anyone
- 220x220 minium build space
- Most Parts Printable
- Dosen’t Start On Fire
Specifications
- Core-XY
- Klipper Powered
Time Log
| Date | Time |
|---|---|
| 2.1.25 | 2 Hours |
| 2.2.25 | 4 Hours |
| 2.3.25 | 5 Hours |
| 2.5.25 | 1 Hours |
| 2.8.25 | 6 Hours |
| 2.17.25 | 6 Hours |
| 2.18.25 | 4 Hours |
| 2.23.25 | 5 Hours |
| 2.24.25 | 2 Hours |
| 2.25.25 | 2 Hours |
| 2.26.25 | 2 Hours |
| 2.28.25 | 4 Hours |
| 3.3.25 | 2 Hours |
| 3.8.25 | 5 Hours |
| 3.18.25 | 6 Hours |
| 3.19.25 | 4 Hours |
| 3.28.25 | 4 Hours |
| 3.29.25 | 2 Hours |
| 3.30.25 | 6 Hours |
| 4.3.25 | 3 Hours |
Design Milestones
Skirt
2.1.25 - 2.8.25
- Made mounts for Pi 5 and BTT Octopus v1.1
- Added builtin mounting for frame
- Allowed screwing quarters together for smaller build volume
Frame
2.17.25 - 2.18.25
- Attempted to add compatibility with enclosing in the future
- Made out of 2020 aluminum extrusion
- Made Sturdy and square
Gantry
2.23.25 - 2.28.25
- Made Core-XY for faster print speeds
- Used MGN12H Rails for decent strength with small form factor
- Designed first revison of the toolhead
Toolhead
3.3.25 - 3.19.25
- Designed toolhead revisions 2 - 4
- Repositioned hotend for more z hight
Minor Fixes and Repositioning
3.19.25 - 3.29.25
- Added Z Axis
- Design Bed Mount
- Moved Power Supply to Back
Toolhead Redesign
3.29.25 - 4.3.25
- Fixed Cooling Ducts
- Repositioned Fans
- Made slimmer form factor
Documentation
4.3.25 - Present
- Rewrote Journal
- Made Documentation more clear
- Wrote BOM
Project Roadmap
- Create CAD Model
- Obtain Funding
- Order Parts
- Assemble working machine
- Tune machine to create high quailty parts
- Persent Machine at Rocky Mountain Rep Rap Fest
- Create Build Documentation
Project End Goal
- Good looking on your desk
- Creates high quailty parts
- Reliable operation
- Fully open source
- Documented for anyone to build
Power Calculations
| Item | Power Draw |
|---|---|
| PCB Bed Heater | 200w |
| Hotend Ceramic Heater | 70w |
| 270w |
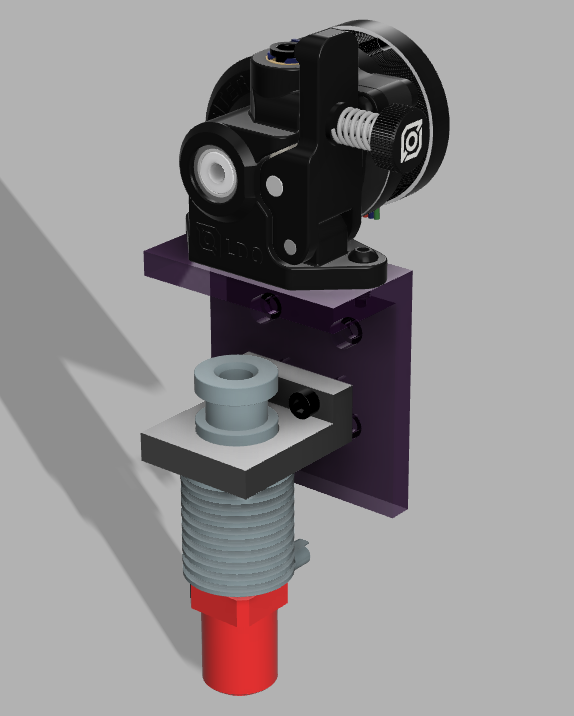
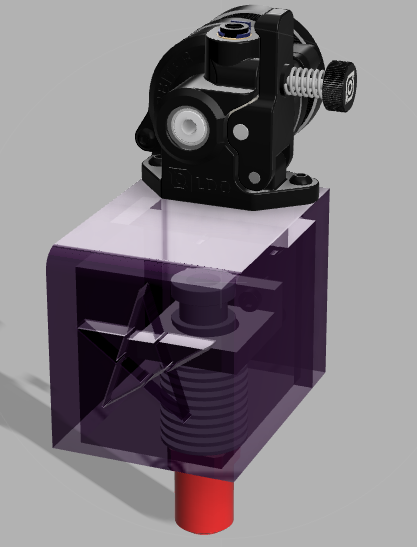
Meteorite Toolhead
Design
Parts
- LDO Orbiter v2.0
- Triangle Labs CHC V6
- 4010 Blower Fan
- 3010 Fan
Design Considerations
- Heats up quickly
- Mounts directly onto rail
- Direct Drive
- Cheap
Rev 01
Rev 02
Rev 03

Rev 04

Rev 05

Why These Parts
Orbitor 2 - From LDO comes with high quality steeper motor + all in one solution
Triangle Labs CHC V6 - Had really high power heater plus is souposed to have higger flow rate then regular V6
Project Timeline
Mar 31st - Finish Design
Apr 10th - Start Build
Apr 15th - Finish Build
Apr 20rd - Finish Tuning
May 2nd - Ship to RMRRF
May 16th - Ship Myself to RMRRF
Featured Parts
XY Stepper Mount
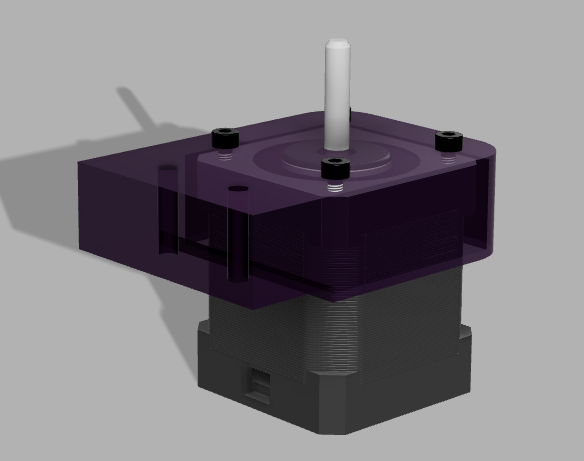
Why Core-XY: I wanted to build a core xy because first of all they are really compact. Second I already own a bed slinger 3d printer. Also the belt routing really interested me.
Power Supply Mount

Changes: Had to move power supply out of the skirt to make space for Z steppers
Spark Console
Why
I din’t want to have a big touchscreen in the center of the machine. I wanted to go for something quince. I chose to have an OLED screen on it to have because it dose not steal the spotlight but can still display useful information. I also added neopixels so that it could have a progress bar that reacts to the current state. Finally I added 8 buttons for commonly used actions for anything more complex you probably want to use the web UI anyway.
Parts
- XIAO rp2040
- Kailh Chocs
- Adafruit Neoxpixels
- 128x32 OLED
Schematic

PCB Render

PCB Layout
