Enderson
Repository link: https://github.com/smartlearningorbit-arch/Enderson
Total hours so far: 32.3 Hr
- [✓] I have a 3D printer or will be getting one before March 21st
Routing the Belt
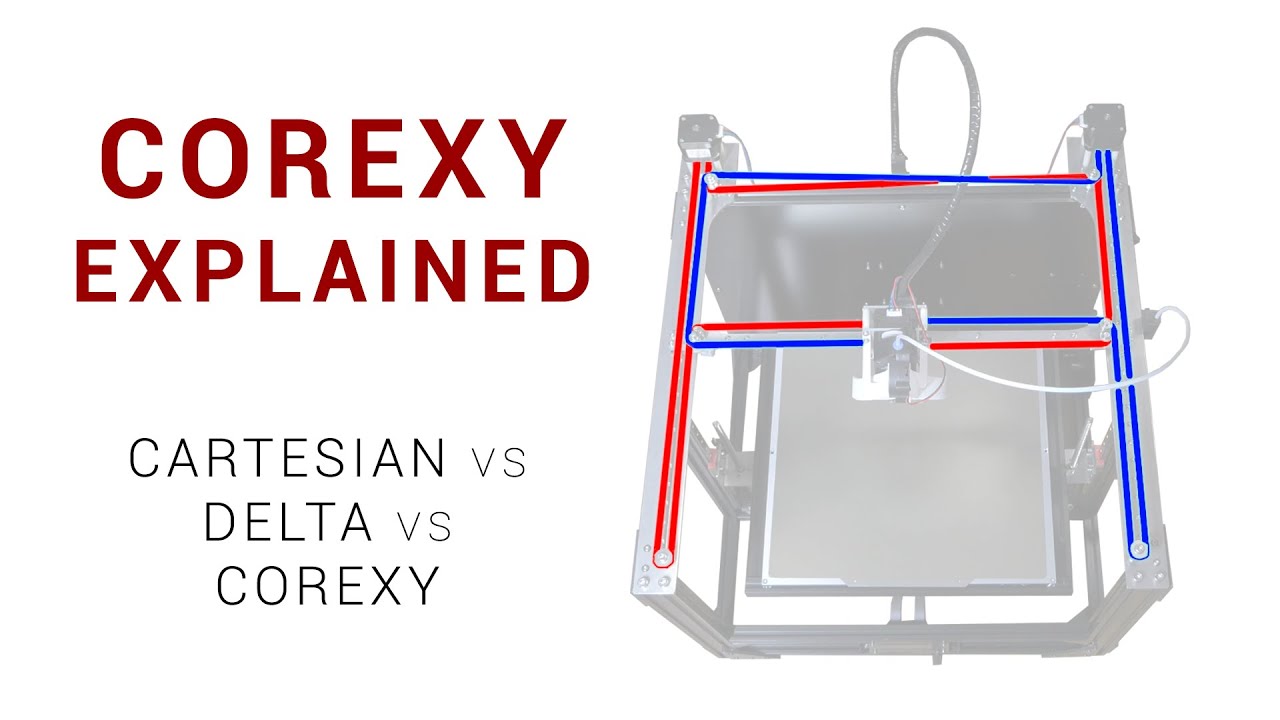
After understanding the whole Core XY system I jump over the Belt routing part
While building we have to consider Some Things in our mind
- The belt should be Parallel
- First thing is belt alignment, belt should be straight and parallel to the frame. If it is tilted then it can wear out fast and cause inaccurate movement.
- Proper belt tension is very important. If belt is too loose then it cause skipping and inaccurate prints, and if too tight then it can damage the pulley or put extra load on motor.
- Make sure both side belt length is equal, otherwise motion will not be balanced and it can create shifting issue.
- Pulley alignment should be perfect. Motor pulley and idler pulley must be in same line, otherwise belt will rub and create friction.
log - 1.2Hr
Understanding the core XY system
~ Source - https://www.youtube.com/watch?v=_ramiM3KHYE
~ Source - https://www.youtube.com/watch?v=NMfFirtB1D4
what I learn
how it works
In a CoreXY system, two motors ( let Suppose A and B) work together to control movement of the TOOL head .
| Motor A | Motor B | Toolhead Movement |
|---|---|---|
| Forward | Forward | +X (Right) |
| Backward | Backward | -X (Left) |
| Forward | Backward | +Y (Forward) |
| Backward | Forward | -Y (Backward) |
Main Point
- Same direction → X movement
- Opposite direction → Y movement
Short Trick to understand
- A + B (same) = X axis
- A + B (opposite) = Y axis
So after
Date/log - Friday, 17 March, 2026 0.7 Hr
Analyse the problem
After taking to Alot Of People. I found there Is Majoy Problem :
Motion System Missing (Fixed) [✓]
- No belt exist
- No pulleys setup
- Motors exist but don’t drive anything
- No working CoreXY mechanism {JUST A CAD}
Z-Axis Weak Design VIA @1mon (Fixed) [✓]
- No guide rail and linear rod
- it is very weak design
- cause Bad print quality or non working printer
Tool head (Fixed) [✓]
- Incorrect fan position
- No cooling duct (Not maintain the air flow)
- No space for Bltouch
- Centre of mass not manage
Structure issue and some geometrical issue (Fixed) [✓]
Date/log - Tuesday, 10 March, 2026 1.7Hr
Preparing BOM
After The design completed I making the BOM
If you are Indian Here is something crazy detail for you Help me know the component Are expensive in India Plus importing from outside The taxes Will rob you So here is the few website Where you find the Component add good price And I also contact Few Indian Hack Clubber Regardingly And they have good experience with these websites previously.
This not Sponsored This is my personal recommendation After conducting a search
Date/log - Tuesday, 10 March, 2026 9 hr
Breaking news — I am no longer buying an Ender 3 for scrap parts.
After conducting a long long long research, I came to a simple conclusion:
It is not worth that much money.
Today I woke up at 11 AM and got back to work.
(I know it is late but I slept at 4:45 AM.)
First I started working on the BOM (Bill of Materials).
While calculating the cost I realized something important.
Buying an Ender 3 for ₹6000 is expensive if I use an external MCU instead of the Ender 3 board v4.2.2.
So I searched for second-hand printers, but most of them were:
- fully worn out
- used for thousands of printing hours
So it doesn’t make sense to buy them. Then I started thinking: If I don’t buy a 3D printer, how will I arrange the parts that need to be 3D printed?
Finally I decided I can get them printed from: - #printing-legion-india
- or some other printing sources.
I will also try to reduce the number of 3D printed parts. New plan for the structure: - Use aluminum sheet for mounting parts
- Use acrylic for the body
Print the final outer case after the printer is working, so it doesn’t affect the print process.
Date/log - Tuesday, 9 March, 2026 0.2Hr
Finalizing the CAD model
After assembling most of the components I spent some time refining the model.
I adjusted the spacing between the gantry and the frame to make sure belts will not rub against the extrusion.
I also verified:
- belt path clearance
- stepper motor alignment
- mounting holes for the idler pulleys
These small adjustments are important because even a few millimeters of misalignment can cause mechanical issues later.
Date/log - Tuesday, 9 March, 2026 0.3Hr
X-Axis Gantry Design
The X-axis gantry connects both sides of the Z frame and carries the toolhead. Because the toolhead moves rapidly left and right, this part must be rigid. If the gantry flexes even slightly, it can cause:
- layer shifting
- ringing
- inaccurate prints
To avoid this I increased the wall thickness of the gantry mount and added extra support ribs.
I also made sure the mounting holes align properly with the aluminum extrusion.
Date/log - Tuesday, 9 March, 2026 0.7Hr
Built Idler Pulleys (Belt Guide Pulleys)
Where did the idler Pulleys To guide the belt Had this part I know that this part is so Sensitive and Broke at high tension So for that I ensured the minimum wall thickness
And the strengthen the part
Here it is
Date/log - Tuesday, 9 March, 2026 0.6Hr
Built a mount for the heat bed
Built a mount for the heat bed Ensuring The strength because it Have to carry The weight of aluminium heat bed + the Weight of model
And also we have to maintain the Tolerance Between the threads screw Even a small wobble can affect print quality at high speed
Date/log - Tuesday, 9 March, 2026 1.2 hr
build Tools head of the printer
I plan to make Tool header as much light as possible cuz At the high speed And high acceleration, The high inertia make the problem So I reduce the weight so less inertia act and put the extruder at the side insead of Putting it with the Tool head
here you see
Date/log - Tuesday, 9 March, 2026 0.7 hr
Make the Lead Screw Support Bearing
so To prevent Lead Screw from Vibration i make a Lead Screw Support Bearing That provider strength to rod plus it help to improve the Quality of the printer At high speed
Date/log - Tuesday, 9 March, 2026 3.9 hr
Assembling the component
Assemble all the component in the In a shape of printer Where I ensure that The weight distribution should be perfect
also Make the Bracket for the stepper motor to be hold
Date/log - Monday , 9 March, 2026 2.1 hr
Research & plan
Mt first thing that i check that the BOM are Available in India and While checking that I found out The raw component is Expensive. Delivery date may be high Show my new approaches is to buy a Ender 3 at 13k Rs And tear down it fully To grab the raw component And one more Reason is that The printer build may contain some 3d printed parts which Need to be printed but I dont have A 3D printer now it Should help me to print the parts also
the component I get after tear down the 3D printer
- NEMA 17 4x
- 24v 15A power supply
- heat Bed
- Hotend Assambley + NOzzel
- Colling Fans x 3
- Aluminium extrusion
- LCD disply which is the good package at that prize point ~ Source - Official BOM + https://www.youtube.com/watch?v=5aGzGpcsVZY / https://www.youtube.com/watch?v=dgxH_Si9KCA
Date/log - Sunday, 8 March, 2026 / 6.5 hr
Research & Plan
Today I worked on planning what features should be included in my 3D printer.
Instead of randomly building things, I wanted to first decide the capabilities and design direction of the printer. So I started by making a feature list of everything that should be part of the machine.
Here is the list I made (please ignore my writing)
At first this list might look simple, but reaching this point actually required a lot of research and thinking.
I didn’t just write random features. For each item I tried to understand:
- Is this feature actually useful for the printer ?
- Will I get the component in India?
- Will it improve reliability or print quality?
So this list is basically the result of many hours of comparison and research.
What I researched while making this list
While creating this feature plan, I explored different topics such as:
- Common features used in modern DIY 3D printers
- Firmware support for different functions
- How these features affect print quality and reliability
This helped me decide which features are important and which are unnecessary for my build.
Resources used
To gather this information I used multiple ~ sources:
- #infill Slack Community (really helpful!!!!!!!!!!!!!!)
- Tutorials
- Documentation
- AI
Using multiple sources helped me verify information and avoid wrong assumptions.
Outcome of this research
By the end of this session I now have A clear feature list for the printer
here It is
Date/log - Saturday, 7 March, 2026 / 5.4 hr
Research & Plan
I’m good with hardware and electronics, but I never made a plotter-based project before.
And a 3D printer works on the same basic principle as a plotter — controlled movement on X, Y, and Z axes.
So before starting the build, I decided to properly understand the architecture.
First 2.4 hours — Understanding the basics
In the beginning I focused on learning the core concepts of how a 3D printer actually works.
Some of the main things I researched were:
~ Source - https://www.youtube.com/watch?v=qub5chyIQ0s&t=4241s
- How Cartesian motion systems work
- How stepper motors control precise movement
- The role of G-code in controlling printer motion
- How the hotend and extruder system push filament
- Basic printer electronics like MCU, stepper drivers, and endstops
- This helped me understand the overall architecture of the machine.
Next 3 hours — Tutorials and deep research
After understanding the basics, I spent the next 3 hours watching tutorials and technical explanations. In total I watched 50+ tutorials and guides abou
I tried to analyze the mistakes people make while building printers, such as:
~ Source https://www.youtube.com/watch?v=c9AS3uP0Lzw&t=17s
- weak frame design
- poor cable management ( It makes difficult to Repair in future)
- incorrect belt tension & Not equal Belt ( Break the pully)
- bad placement of electronics { Causing heat Issue and Not proper weight balance }
Understanding these mistakes is important because it helps me avoid them while designing my own printer. What I learned from this research
This research phase was important because it will help me plan the printer more efficiently before starting the actual build.